
Do you have any antique wooden furniture that you find unappealing?
Or does it offend you so much that you wish you could get rid of it whenever you go for a walk, and your eyes catch it?
Is it that ancient, and does it have scratches and other damage on its surfaces? If you're having this issue, this article is for you.
In this article, I'll teach you how to transform your furniture on your own, giving it a luxurious and essential look.
Like you, I had a similar issue. I have an old piece of wood furniture, a desk, which is quite ugly and horrible.
I've been debating whether to get rid of it or if there's any chance I could bring it back to its previous glory, if not better.
With my experience as a handyman and DIY enthusiast, I felt I could complete this project independently and have a good time doing it.
History of my desk
This piece of furniture was inherited from my dad. According to him, he got it from his uncle, who happens to be a carpenter.
He received the furniture as a birthday gift when he turned 20, and he has been using this furniture since then.
On the other hand, got it late it was given to me when I turned 25, so
approximately, this piece of furniture should be over 20 years
old.
The damages and scratches were so appalling that I quickly jumped into action to restore it when
I found out how I could transform it.
Let's get started
The first thing you must do is to take off the parts.
Remove the drawers and unscrew all the drawer knobs or handle using a screwdriver.
Prepare for stripping
If the top of your furniture is terrible, you will have to do some stripping off.
To do that, you will need a stripping gel.The gel's primary purpose is to remove dry latex and oil-based paint and also to remove the lacquer, which is a shiny finish usually applied to the surface of wooden furniture.
Apply the gel to the surface of your furniture with a painting brush and cover it with plastic leaving it for about 24 hours.
After 24 hours, your furniture should be easier to strip.
Using a plastic or metal stripper, strip in the direction of the wood grain to get rid of all bad spots and scratch marks on the surface of your furniture.
Clean the surface
When done with the stripping, clean the stripped surface using mineral spirit.
Apply the spirit in a damper cloth and use that to clean the surface of your desk until is you have gotten rid of all the stripped residues.
Allow your furniture to dry for some minutes.
Use 120 grit sandpaper for sanding your wooden furniture starting from the top. Sand all the sides too, not forgetting the drawer's surfaces too.Repeat the same procedure using 150, 180, and 220 grit sandpaper.
You will get from this that the sanding will help the stain to adhere quickly to your furniture to give it a magnificent look.
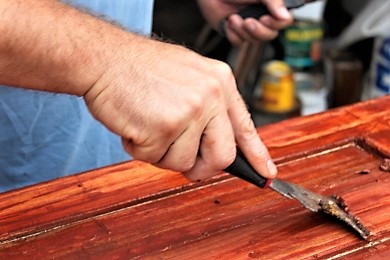
Staining
After this process, you can use a walnut veneer stain to restore your furniture back to its former glory.
Use a foam brush to apply the stain all over the furniture. Allow the stain on the furniture for seconds, and then wipe off the excess using a cloth.
Do this for the drawers you have also removed and quickly wipe off the excess stain.
You can apply 2 or more coats of stain if you are not satisfied with the first.
You should get a good result after the second try.

pic; www.erinspain.com
Bonus
If you notice some parts of your furniture have been chunked off or, for instance, unexplained holes or crevices, you can use an epoxy wood filler to fill that crevice.
Some epoxy wood fillers are sausage-like, which you will just have to cut using a knife and then mix it using your hand.
Apply the filler to the crevices area and wait for some hours to dry properly.
Sand lightly using your sandpaper after it has dried to make it smooth and well leveled to be in line with the other parts of the furniture.
Apply the walnut stain to that area after cleaning the surface.
Finish
off by applying a lacquer coat
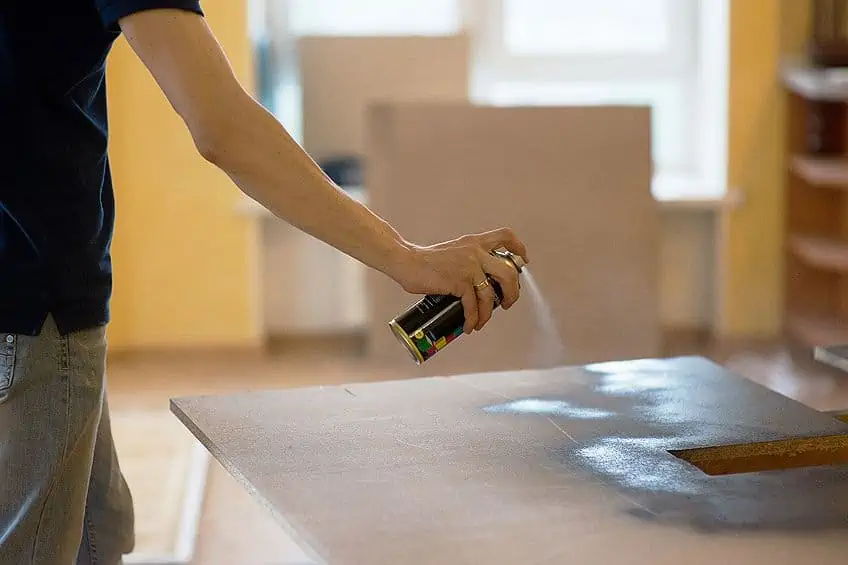
pic; www.woodhappen.com
Once the stain has dried, apply a top coat lacquer.
The lacquer is to give the stain work a shiny finish and also to protect it.
Spray more coats on the top than the sides of the furniture. The top will basically be used more than all the sides.
Gently squeeze the trigger of the lacquer can lightly and spray the lacquer lightly across from side to side.
Continue with the application of the lacquer until you get a perfect finishing.
Allow the furniture to dry for
a few minutes to touch.
Be sure to fix everything back in order. That is, the drawers and their knobs.
Your piece of furniture should look as good as new after the restoration process.
How long does it take to restore wood furniture?
Depending on the size of your furniture, the restoration process could take up to two days.
Resources
- Striping gel
- metal striper
- mineral spirit
- 120,220 sand paper
- 150 sand paper
- 180 sand paper
- screwdriver
- veneer wood stain
- epoxywood filler
- coat lacquer
PS; There are affiliate links in this post. My full disclosure can be found here. I earn money as an Amazon Associate by making qualifying purchases at no extra cost to you.
Comments
Post a Comment